Flutter Sectioned ListView Examples
Sectioned ListView Widget in Flutter
Sectioned ListView widget is a useful and powerful widget in Flutter that allows developers to display a list of items grouped by a specific category or section. It is a great way to organize and present data in a more efficient and user-friendly way. In this article, we will walk through the steps required to implement a Sectioned ListView widget in Flutter.
Getting Started
Before we begin, make sure you have Flutter installed on your machine. If you don't have it installed, you can download it from the official Flutter website. Once you have Flutter installed, you can create a new Flutter project in your preferred IDE.
Adding Dependencies
To use the Sectioned ListView widget, we need to add the flutter_section_list dependency to our pubspec.yaml file. To do that, open your pubspec.yaml file and add the following code:
dependencies:
  flutter:
    sdk: flutter
  flutter_section_list: ^0.1.1
After adding the dependency, run flutter pub get to download and install the required packages.
Creating the Data Model
We need to create a data model that represents the data we want to display in our Sectioned ListView widget. In this example, we will create a simple data model that represents a list of fruits grouped by their category.
class Fruit {
  final String name;
  final String category;

  Fruit({required this.name, required this.category});
}

List<Fruit> fruits = [
  Fruit(name: 'Apple', category: 'Fruits'),
  Fruit(name: 'Banana', category: 'Fruits'),
  Fruit(name: 'Orange', category: 'Fruits'),
  Fruit(name: 'Tomato', category: 'Vegetables'),
  Fruit(name: 'Carrot', category: 'Vegetables'),
  Fruit(name: 'Spinach', category: 'Vegetables'),
];
Creating the Sectioned ListView Widget
Now that we have our data model, we can create the Sectioned ListView widget. In this example, we will create a simple Sectioned ListView widget that displays the list of fruits grouped by their category.
import 'package:flutter/material.dart';
import 'package:flutter_section_list/flutter_section_list.dart';
class SectionedListView extends StatelessWidget {
Widget build(BuildContext context) {
return Scaffold(
appBar: AppBar(
title: Text('Sectioned ListView'),
),
body: FlutterSectionList(
sectionCount: 2,
itemCountOfSection: (section) {
if (section == 0) {
return fruits.where((fruit) => fruit.category == 'Fruits').length;
} else {
return fruits.where((fruit) => fruit.category == 'Vegetables').length;
}
},
headerInSection: (section) {
if (section == 0) {
return Text('Fruits');
} else {
return Text('Vegetables');
}
},
itemBuilder: (section, index) {
if (section == 0) {
var fruit = fruits.where((fruit) => fruit.category == 'Fruits').toList()[index];
return ListTile(
title: Text(fruit.name),
subtitle: Text(fruit.category),
);
} else {
var fruit = fruits.where((fruit) => fruit.category == 'Vegetables').toList()[index];
return ListTile(
title: Text(fruit.name),
subtitle: Text(fruit.category),
);
}
},
),
);
}
}
In the code above, we created a SectionedListView widget that displays the list of fruits grouped by their category. We used the FlutterSectionList widget provided by the flutter_section_list package to create the Sectioned ListView widget.
We set the sectionCount property to 2, as we have two categories: Fruits and Vegetables. We used the itemCountOfSection property to define the number of items in each section. We also used the headerInSection property to display the header for each section.
Finally, we used the itemBuilder property to build the list items for each section. In the itemBuilder function, we filtered the list of fruits based on their category and returned a ListTile widget for each fruit.
More Examples
This section will look at examples showing how to section or group items in a listview. This type of widget is called a grouped or sectioned listview.
If you want to learn the normal ListView then check here
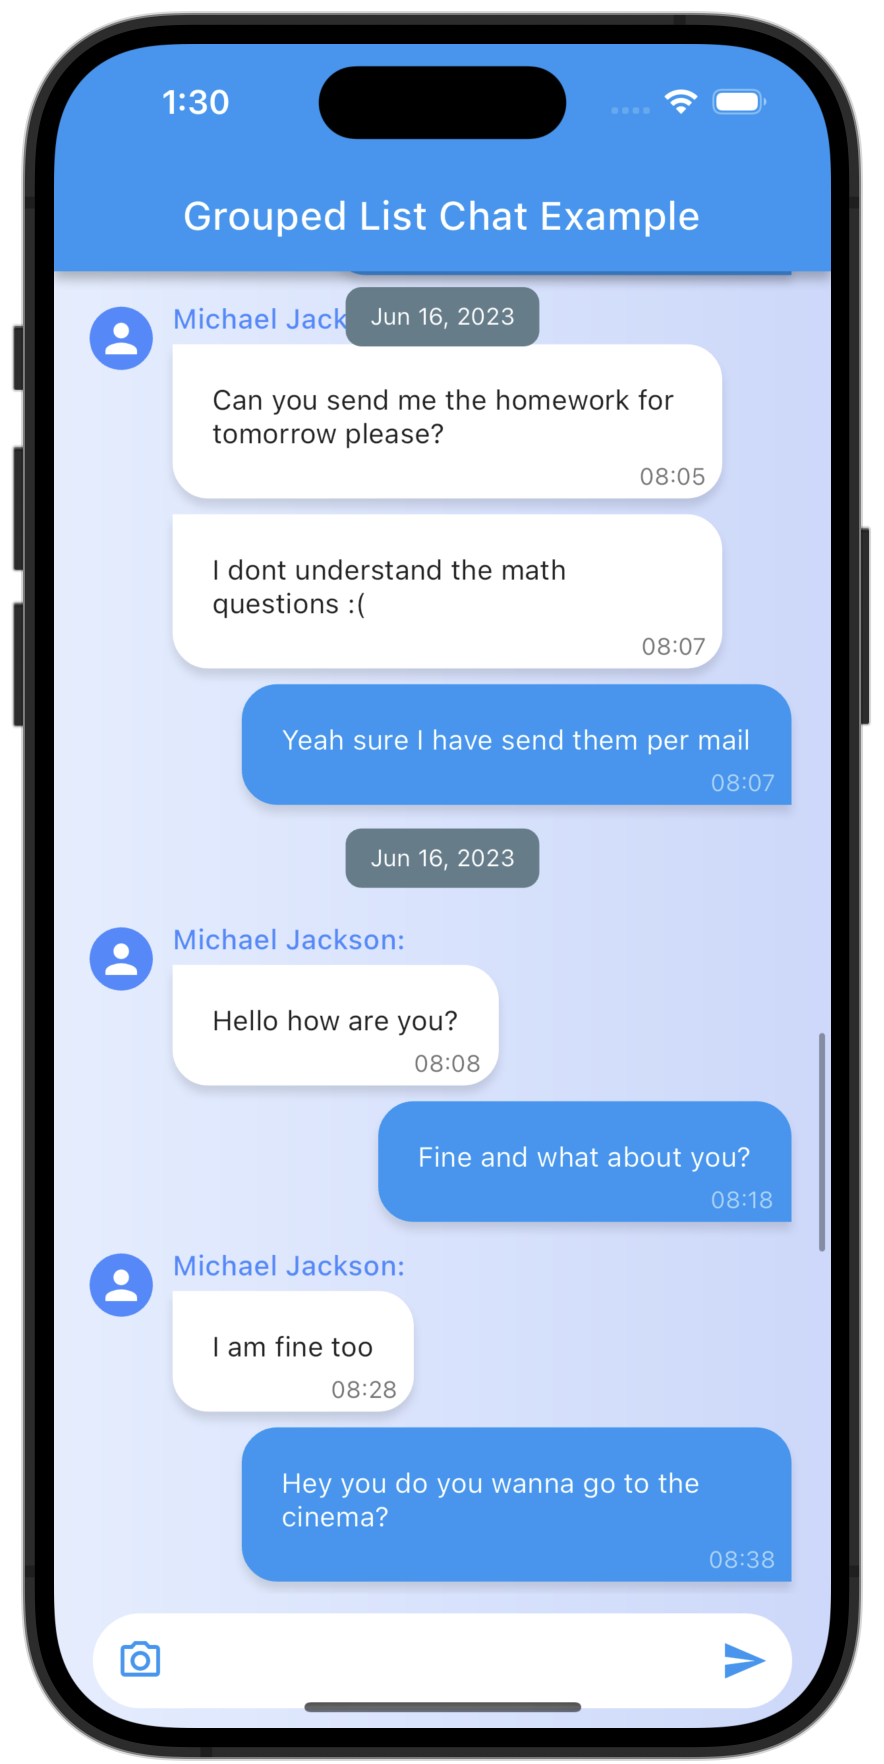
Example 1: Flutter Grouped List Example using grouped_list
grouped_listis a Flutter ListView in which items can be grouped into sections.
Here are the features of grouped_list package:
- Sound null safety support!
- Easy creation of chat dialog.
- List Items can be separated in groups.
- For the groups an individual header can be set.
- Almost all fields from
ListView.builderavailable.
Check the screenshots for example we will create:
Step 1: Create Project
Start by creating an empty flutter project.
Step 2: Add Dependency
Next add grouped_list as a dependency in your pubspec.yaml:
grouped_list: ^4.1.0
Then sync or flutter pub get to install it.
Step 3: Create GroupedListView
First import the grouped_list package:
import 'package:grouped_list/grouped_list.dart';
Then replace your ListView with the GroupedListView, and utilize additional options as shown below:
 GroupedListView<dynamic, String>(
   elements: _elements,
   groupBy: (element) => element['group'],
   groupSeparatorBuilder: (String groupByValue) => Text(groupByValue),
   itemBuilder: (context, dynamic element) => Text(element['name']),
   itemComparator: (item1, item2) => item1['name'].compareTo(item2['name']), // optional
   useStickyGroupSeparators: true, // optional
   floatingHeader: true, // optional
   order: GroupedListOrder.ASC, // optional
 ),
Full Example
Let us look at a full example of how to create a Grouped or Sectioned ListView using this library.
Step 1: Create Project
Cretae project as has been discussed.
Step 2: Install Library
Install the library as has been discussed.
pubspec.yaml
dependencies:
  flutter:
    sdk: flutter
  grouped_list:
    path: ../
  intl: ^0.17.0
Step 4: Create Chat ListView
Use the following code to create a chatview using this sectioned listview:
chat_example.dart
import 'package:flutter/material.dart';
import 'package:grouped_list/grouped_list.dart';
import 'package:intl/intl.dart';
void main() => runApp(MyApp());
List<Element> _elements = [
Element(DateTime(2020, 6, 24, 9, 25), 'Hello how are you?'),
Element(DateTime(2020, 6, 24, 9, 36), 'Fine and what about you?', true),
Element(DateTime(2020, 6, 24, 9, 39), 'I am fine too'),
Element(DateTime(2020, 6, 25, 14, 12),
'Hey you do you wanna go to the cinema?', true),
Element(
DateTime(2020, 6, 25, 14, 19), 'Yes of course when do we want to meet'),
Element(DateTime(2020, 6, 25, 14, 20), 'Lets meet at 8 o clock', true),
Element(DateTime(2020, 6, 25, 14, 25), 'Okay see you then :)'),
Element(DateTime(2020, 6, 27, 18, 41),
'Hey whats up? Can you help me real quick?'),
Element(DateTime(2020, 6, 27, 18, 45), 'Of course what do you need?', true),
Element(DateTime(2020, 6, 28, 8, 47),
'Can you send me the homework for tomorrow please?'),
Element(
DateTime(2020, 6, 28, 8, 48),
'I dont understand the math questions :(',
),
Element(DateTime(2020, 6, 28, 8, 56), 'Yeah sure I have send them per mail',
true),
];
class MyApp extends StatelessWidget {
Widget build(BuildContext context) {
return MaterialApp(
debugShowCheckedModeBanner: false,
title: 'Grouped List Chat Example',
theme: ThemeData(
primarySwatch: Colors.blue,
),
home: Scaffold(
appBar: AppBar(
title: Text('Grouped List View Example'),
),
body: Builder(
builder: (context) => Column(
children: [
Container(
height: MediaQuery.of(context).size.height * 0.8,
child: GroupedListView<Element, DateTime>(
elements: _elements,
order: GroupedListOrder.DESC,
reverse: true,
floatingHeader: true,
useStickyGroupSeparators: true,
groupBy: (Element element) => DateTime(
element.date.year, element.date.month, element.date.day),
groupHeaderBuilder: (Element element) => Container(
height: 40,
child: Align(
child: Container(
width: 120,
decoration: BoxDecoration(
color: Colors.blue,
borderRadius:
const BorderRadius.all(Radius.circular(10.0)),
),
child: Padding(
padding: const EdgeInsets.all(8.0),
child: Text(
'${DateFormat.yMMMd().format(element.date)}',
textAlign: TextAlign.center,
),
),
),
),
),
itemBuilder: (_, Element element) {
return Align(
alignment: element.sender
? Alignment.centerRight
: Alignment.centerLeft,
child: Container(
width: MediaQuery.of(context).size.width * 0.9,
child: Card(
shape: RoundedRectangleBorder(
borderRadius: BorderRadius.circular(6.0),
),
elevation: 8.0,
margin: const EdgeInsets.symmetric(
horizontal: 10.0, vertical: 6.0),
child: ListTile(
contentPadding: const EdgeInsets.symmetric(
horizontal: 20.0, vertical: 10.0),
leading: element.sender
? Text(DateFormat.Hm().format(element.date))
: const Icon(Icons.person),
title: Text(element.name),
trailing: element.sender
? const Icon(Icons.person_outline)
: Text(DateFormat.Hm().format(element.date)),
),
),
),
);
},
),
),
],
),
),
),
);
}
}
class Element implements Comparable {
DateTime date;
String name;
bool sender = false;
Element(this.date, this.name, [this.sender = false]);
int compareTo(other) {
return date.compareTo(other.date);
}
}
More code
example_sliver.dart
import 'package:flutter/material.dart';
import 'package:grouped_list/sliver_grouped_list.dart';
void main() => runApp(MyApp());
List _elements = [
{'name': 'John', 'group': 'Team A'},
{'name': 'Will', 'group': 'Team B'},
{'name': 'Beth', 'group': 'Team A'},
{'name': 'Miranda', 'group': 'Team B'},
{'name': 'Mike', 'group': 'Team C'},
{'name': 'Danny', 'group': 'Team C'},
];
class MyApp extends StatelessWidget {
Widget build(BuildContext context) {
return MaterialApp(
debugShowCheckedModeBanner: false,
title: 'Flutter Demo',
theme: ThemeData(
primarySwatch: Colors.blue,
),
home: Scaffold(
appBar: AppBar(
title: Text('Grouped List View Example'),
),
body: CustomScrollView(
slivers: [
SliverGroupedListView<dynamic, String>(
elements: _elements,
groupBy: (element) => element['group'],
groupComparator: (value1, value2) => value2.compareTo(value1),
itemComparator: (item1, item2) =>
item1['name'].compareTo(item2['name']),
order: GroupedListOrder.DESC,
groupSeparatorBuilder: (String value) => Padding(
padding: const EdgeInsets.all(8.0),
child: Text(
value,
textAlign: TextAlign.center,
style: TextStyle(fontSize: 20, fontWeight: FontWeight.bold),
),
),
itemBuilder: (c, element) {
return Card(
elevation: 8.0,
margin: EdgeInsets.symmetric(horizontal: 10.0, vertical: 6.0),
child: Container(
child: ListTile(
contentPadding: EdgeInsets.symmetric(
horizontal: 20.0, vertical: 10.0),
leading: Icon(Icons.account_circle),
title: Text(element['name']),
trailing: Icon(Icons.arrow_forward),
),
),
);
},
),
],
),
),
);
}
}
example.dart
import 'package:flutter/material.dart';
import 'package:grouped_list/grouped_list.dart';
void main() => runApp(MyApp());
List _elements = [
{'name': 'John', 'group': 'Team A'},
{'name': 'Will', 'group': 'Team B'},
{'name': 'Beth', 'group': 'Team A'},
{'name': 'Miranda', 'group': 'Team B'},
{'name': 'Mike', 'group': 'Team C'},
{'name': 'Danny', 'group': 'Team C'},
];
class MyApp extends StatelessWidget {
Widget build(BuildContext context) {
return MaterialApp(
debugShowCheckedModeBanner: false,
title: 'Flutter Demo',
theme: ThemeData(
primarySwatch: Colors.blue,
),
home: Scaffold(
appBar: AppBar(
title: Text('Grouped List View Example'),
),
body: GroupedListView<dynamic, String>(
elements: _elements,
groupBy: (element) => element['group'],
groupComparator: (value1, value2) => value2.compareTo(value1),
itemComparator: (item1, item2) =>
item1['name'].compareTo(item2['name']),
order: GroupedListOrder.DESC,
useStickyGroupSeparators: true,
groupSeparatorBuilder: (String value) => Padding(
padding: const EdgeInsets.all(8.0),
child: Text(
value,
textAlign: TextAlign.center,
style: TextStyle(fontSize: 20, fontWeight: FontWeight.bold),
),
),
itemBuilder: (c, element) {
return Card(
elevation: 8.0,
margin: EdgeInsets.symmetric(horizontal: 10.0, vertical: 6.0),
child: Container(
child: ListTile(
contentPadding:
EdgeInsets.symmetric(horizontal: 20.0, vertical: 10.0),
leading: Icon(Icons.account_circle),
title: Text(element['name']),
trailing: Icon(Icons.arrow_forward),
),
),
);
},
),
),
);
}
}
Run
Copy the code or download it in the link below, build and run.
Reference
Here are the reference links:
| Number | Link |
|---|---|
| 1. | Download Example |
| 2. | Follow code author |
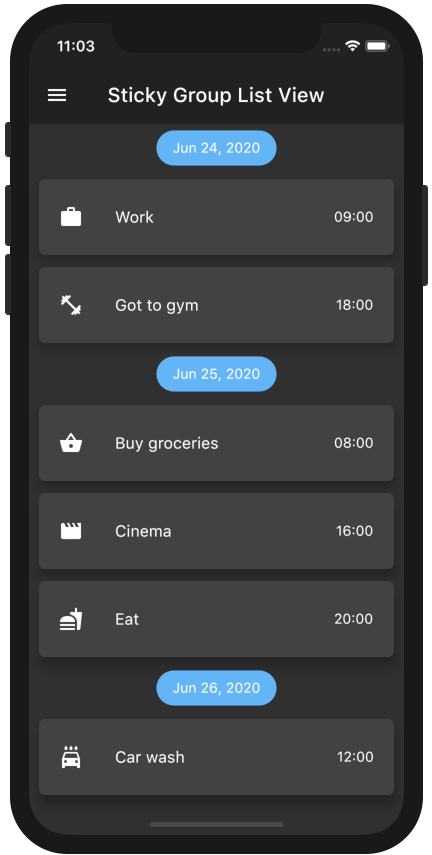
Example 2: Sticky Grouped List Example
This is a grouped listview with sticky headers. It uses the sticky_grouped_list library.
sticky_grouped_listis a ListView with sticky headers in which list items can be grouped to sections.
Here are it's features:
- Easy creation of chat-like interfaces.
- List items can be separated in groups.
- For the groups an individual header can be set.
- Sticky headers with floating option.
- All fields from
ScrollablePositionedListavailable.
Here is the screenshot of the created project:
Step 1: Create Project
Start by creating an empty flutter project.
Step 2: Install it
Install the Sticky grouped list by depending on it in the pubspec.yaml as follows:
sticky_grouped_list: ^2.0.0-nullsafety.2
flutter pub get or sync to fetch it.
Step 3: Create Sticky Grouped ListView
Start by importing the package:
import 'package:sticky_grouped_list/sticky_grouped_list.dart';
Then create a StickyGroupedListView as follows:
 StickyGroupedListView<dynamic, String>(
   elements: _elements,
   groupBy: (dynamic element) => element['group'],
   groupSeparatorBuilder: (dynamic element) => Text(element['group']),
   itemBuilder: (context, dynamic element) => Text(element['name']),
   itemComparator: (element1, element2) => element1['name'].compareTo(element2['name']), // optional
   itemScrollController: GroupedItemScrollController(), // optional
   order: StickyGroupedListOrder.ASC, // optional
 ),
Full Example
Step 1: Create Project
Create flutter project as has been discussed.
Step 2: Install Library
Install the library as has been discussed.
dependencies:
  flutter:
    sdk: flutter
  sticky_grouped_list:
    path: ../
  intl: ^0.17.0
Step 5: Write Code
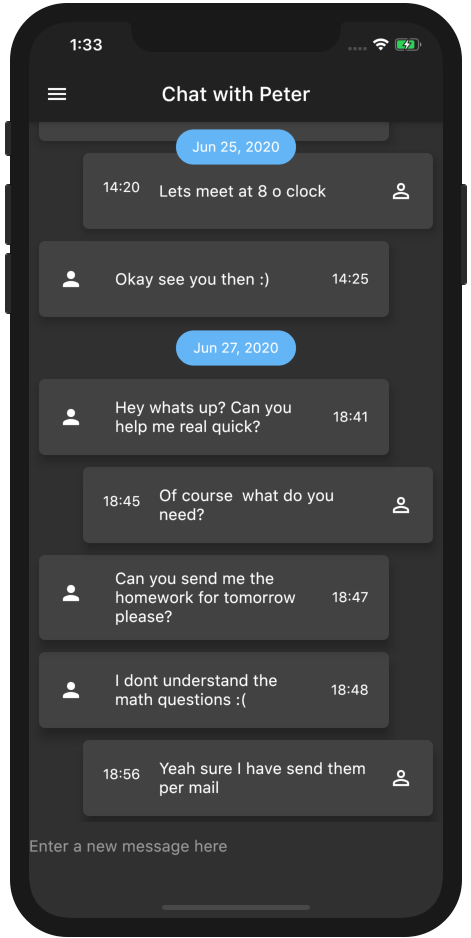
(a).Chat Screen Example
For Example to create a chat screen use the following code:
chatExample.dart
import 'package:flutter/material.dart';
import 'package:intl/intl.dart';
import 'package:sticky_grouped_list/sticky_grouped_list.dart';
void main() => runApp(MyApp());
List<Element> _elements = <Element>[
Element(DateTime(2020, 6, 24, 9, 25), 'Hello how are you?'),
Element(DateTime(2020, 6, 24, 9, 36), 'Fine and what about you?', true),
Element(DateTime(2020, 6, 24, 9, 39), 'I am fine too'),
Element(DateTime(2020, 6, 25, 14, 12),
'Hey you do you wanna go to the cinema?', true),
Element(
DateTime(2020, 6, 25, 14, 19), 'Yes of course when do we want to meet'),
Element(DateTime(2020, 6, 25, 14, 20), 'Lets meet at 8 o clock', true),
Element(DateTime(2020, 6, 25, 14, 25), 'Okay see you then :)'),
Element(DateTime(2020, 6, 27, 18, 41),
'Hey whats up? Can you help me real quick?'),
Element(DateTime(2020, 6, 27, 18, 45), 'Of course what do you need?', true),
Element(DateTime(2020, 6, 27, 18, 47),
'Can you send me the homework for tomorrow please?'),
Element(
DateTime(2020, 6, 27, 18, 48),
'I dont understand the math questions :(',
),
Element(DateTime(2020, 6, 27, 18, 56), 'Yeah sure I have send them per mail',
true),
];
class MyApp extends StatelessWidget {
Widget build(BuildContext context) {
return MaterialApp(
debugShowCheckedModeBanner: false,
title: 'Flutter Demo',
theme: ThemeData(
primarySwatch: Colors.blue,
),
home: Scaffold(
appBar: AppBar(
title: Text('Chat with Peter'),
),
body: Column(
children: [
Container(
height: 700,
child: StickyGroupedListView<Element, DateTime>(
elements: _elements,
order: StickyGroupedListOrder.DESC,
reverse: true,
groupBy: (Element element) => DateTime(
element.date.year, element.date.month, element.date.day),
floatingHeader: true,
groupSeparatorBuilder: (Element element) => Container(
height: 50,
child: Align(
alignment: Alignment.center,
child: Container(
width: 120,
decoration: BoxDecoration(
color: Colors.blue[300],
border: Border.all(
color: Colors.blue[300]!,
),
borderRadius: BorderRadius.all(Radius.circular(20.0)),
),
child: Padding(
padding: const EdgeInsets.all(8.0),
child: Text(
'${DateFormat.yMMMd().format(element.date)}',
textAlign: TextAlign.center,
),
),
),
),
),
itemBuilder: (_, Element element) {
return Align(
alignment: element.swapped
? Alignment.centerRight
: Alignment.centerLeft,
child: Container(
width: 370,
child: Card(
shape: RoundedRectangleBorder(
borderRadius: BorderRadius.circular(6.0),
),
elevation: 8.0,
margin: new EdgeInsets.symmetric(
horizontal: 10.0, vertical: 6.0),
child: Container(
child: ListTile(
contentPadding: EdgeInsets.symmetric(
horizontal: 20.0, vertical: 10.0),
leading: element.swapped
? Text(DateFormat.Hm().format(element.date))
: Icon(Icons.person),
title: Text(element.name),
trailing: element.swapped
? Icon(Icons.person_outline)
: Text(DateFormat.Hm().format(element.date)),
),
),
),
),
);
},
),
),
TextField(
decoration: InputDecoration(
border: InputBorder.none,
hintText: 'Enter a new message here'),
),
],
),
),
);
}
}
class Element implements Comparable {
DateTime date;
String name;
bool swapped = false;
Element(this.date, this.name, [this.swapped = false]);
int compareTo(other) {
return date.compareTo(other.date);
}
}
(b). Sticky Grouped ListView Example
example.dart
import 'package:flutter/material.dart';
import 'package:sticky_grouped_list/sticky_grouped_list.dart';
void main() => runApp(MyApp());
List<Element> _elements = <Element>[
Element(DateTime(2020, 6, 24, 18), 'Got to gym', Icons.fitness_center),
Element(DateTime(2020, 6, 24, 9), 'Work', Icons.work),
Element(DateTime(2020, 6, 25, 8), 'Buy groceries', Icons.shopping_basket),
Element(DateTime(2020, 6, 25, 16), 'Cinema', Icons.movie),
Element(DateTime(2020, 6, 25, 20), 'Eat', Icons.fastfood),
Element(DateTime(2020, 6, 26, 12), 'Car wash', Icons.local_car_wash),
Element(DateTime(2020, 6, 27, 12), 'Car wash', Icons.local_car_wash),
Element(DateTime(2020, 6, 27, 13), 'Car wash', Icons.local_car_wash),
Element(DateTime(2020, 6, 27, 14), 'Car wash', Icons.local_car_wash),
Element(DateTime(2020, 6, 27, 15), 'Car wash', Icons.local_car_wash),
Element(DateTime(2020, 6, 28, 12), 'Car wash', Icons.local_car_wash),
Element(DateTime(2020, 6, 29, 12), 'Car wash', Icons.local_car_wash),
Element(DateTime(2020, 6, 29, 12), 'Car wash', Icons.local_car_wash),
Element(DateTime(2020, 6, 30, 12), 'Car wash', Icons.local_car_wash),
];
class MyApp extends StatelessWidget {
Widget build(BuildContext context) {
return MaterialApp(
debugShowCheckedModeBanner: false,
title: 'Flutter Demo',
theme: ThemeData(
primarySwatch: Colors.blue,
),
home: Scaffold(
appBar: AppBar(
title: Text('Grouped List View Example'),
),
body: StickyGroupedListView<Element, DateTime>(
elements: _elements,
order: StickyGroupedListOrder.ASC,
groupBy: (Element element) =>
DateTime(element.date.year, element.date.month, element.date.day),
groupComparator: (DateTime value1, DateTime value2) =>
value2.compareTo(value1),
itemComparator: (Element element1, Element element2) =>
element1.date.compareTo(element2.date),
floatingHeader: true,
groupSeparatorBuilder: (Element element) => Container(
height: 50,
child: Align(
alignment: Alignment.center,
child: Container(
width: 120,
decoration: BoxDecoration(
color: Colors.blue[300],
border: Border.all(
color: Colors.blue[300]!,
),
borderRadius: BorderRadius.all(Radius.circular(20.0)),
),
child: Padding(
padding: const EdgeInsets.all(8.0),
child: Text(
'${element.date.day}. ${element.date.month}, ${element.date.year}',
textAlign: TextAlign.center,
),
),
),
),
),
itemBuilder: (_, Element element) {
return Card(
shape: RoundedRectangleBorder(
borderRadius: BorderRadius.circular(6.0),
),
elevation: 8.0,
margin: new EdgeInsets.symmetric(horizontal: 10.0, vertical: 6.0),
child: Container(
child: ListTile(
contentPadding:
EdgeInsets.symmetric(horizontal: 20.0, vertical: 10.0),
leading: Icon(element.icon),
title: Text(element.name),
trailing: Text('${element.date.hour}:00'),
),
),
);
},
),
),
);
}
}
class Element {
DateTime date;
String name;
IconData icon;
Element(this.date, this.name, this.icon);
}
Run
Copy the code or download it in the link below, build and run.
Reference
Here are the reference links:
| Number | Link |
|---|---|
| 1. | Download Example |
| 2. | Follow code author |
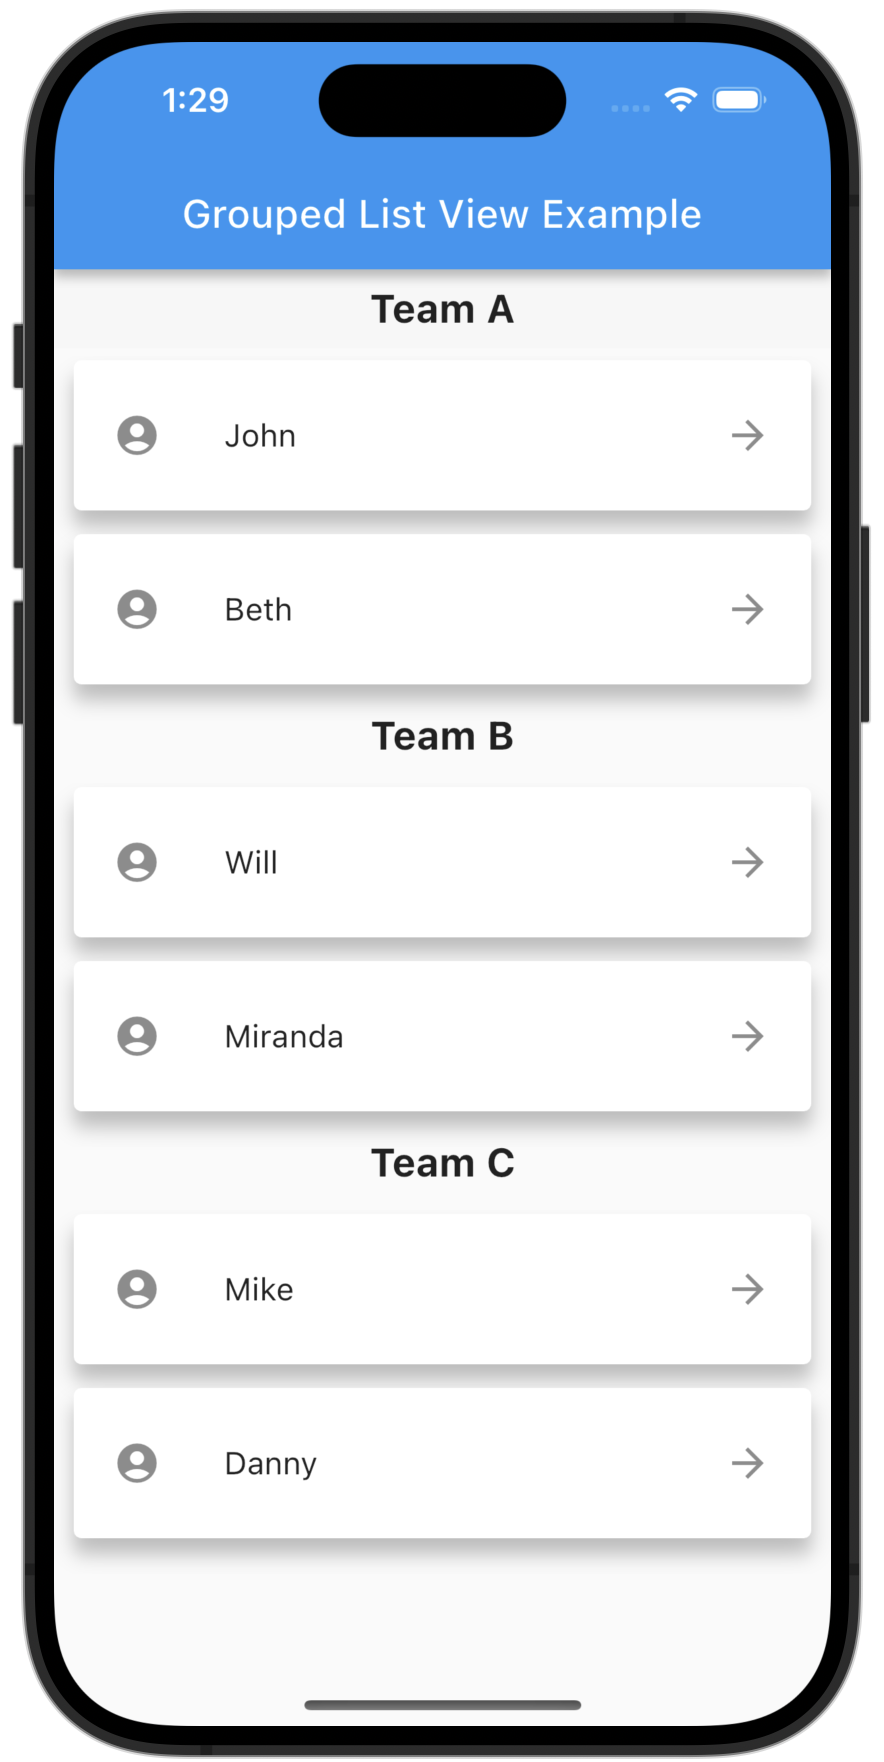
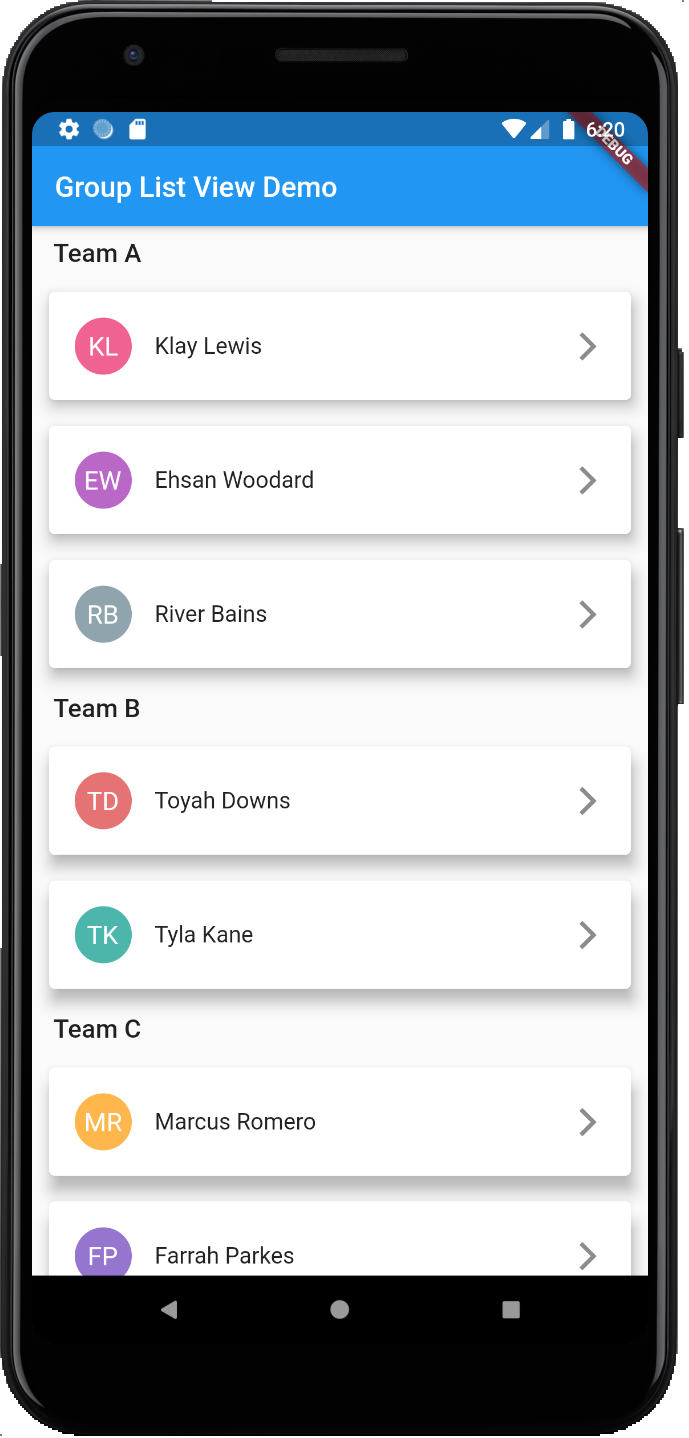
Example 3: Flutter GroupListView Example
This is another example of how to create a grouped or sectioned listview in flutter. This time round we use the flutter_group_list_view package.
flutter_group_list_viewis a ListView that allows you to group list items and support headers like iOS UITableView section.
Here are it's features:
- List Items can be grouped.
- Support headers for each group.
- All fields from
ListView.builderconstructor available.
Here's the demo of the project that will be created:
Step 1: Create Project
Start by creating an empty flutter project.
Step 2: Install it
In your pubspec.yaml declare this library as a dependency:
group_list_view: ^1.1.1
Step 3: Create Grouped ListView
Start by importing it:
import 'package:group_list_view/group_list_view.dart';
Now rather than the standard Flutter ListView, use the GroupedListView:
 Map<String, List> _elements = {
   'Team A': ['Klay Lewis', 'Ehsan Woodard', 'River Bains'],
   'Team B': ['Toyah Downs', 'Tyla Kane'],
 };
 GroupListView(
   sectionsCount: _elements.keys.toList().length,
   countOfItemInSection: (int section) {
     return _elements.values.toList()[section].length;
   },
   itemBuilder: (BuildContext context, IndexPath index) {
     return Text(
       _elements.values.toList()[index.section][index.index],
       style: TextStyle(color: Colors.white, fontSize: 18),
     );
   },
   groupHeaderBuilder: (BuildContext context, int section) {
     return Padding(
       padding: const EdgeInsets.symmetric(horizontal: 15, vertical: 8),
       child: Text(
         _elements.keys.toList()[section],
         style: TextStyle(fontSize: 18, fontWeight: FontWeight.w600),
       ),
     );
   },
   separatorBuilder: (context, index) => SizedBox(height: 10),
   sectionSeparatorBuilder: (context, section) => SizedBox(height: 10),
 );
Full Example
Here is a full example
Step 1: Create Project
Create as has been discussed.
Step 2: Install Library
Install the library as has been discussed.
Step 3: Write Code
app_colors.dart
Create a class to hold the colors that will be applied to the icons in the ListView:
import 'package:flutter/material.dart';
class AppColors {
  static const List<Color> avatarColors = [
    Color(0xffe57373),
    Color(0xfff06292),
    Color(0xffba68c8),
    Color(0xff9575cd),
    Color(0xff7986cb),
    Color(0xff64b5f6),
    Color(0xff4fc3f7),
    Color(0xff4dd0e1),
    Color(0xff4db6ac),
    Color(0xff81c784),
    Color(0xffaed581),
    Color(0xffff8a65),
    Color(0xffd4e157),
    Color(0xffffd54f),
    Color(0xffffb74d),
    Color(0xffa1887f),
    Color(0xff90a4ae)
  ];
}
main.dart
Render data on the GroupedListView
import 'package:flutter/material.dart';
import 'package:group_list_view/group_list_view.dart';
import 'package:group_listview_example/app_colors.dart';
void main() => runApp(MyApp());
Map<String, List> _elements = {
'Team A': ['Klay Lewis', 'Ehsan Woodard', 'River Bains'],
'Team B': ['Toyah Downs', 'Tyla Kane'],
'Team C': ['Marcus Romero', 'Farrah Parkes', 'Fay Lawson', 'Asif Mckay'],
'Team D': [
'Casey Zuniga',
'Ayisha Burn',
'Josie Hayden',
'Kenan Walls',
'Mario Powers'
],
'Team Q': ['Toyah Downs', 'Tyla Kane', 'Toyah Downs'],
};
class MyApp extends StatelessWidget {
Widget build(BuildContext context) {
return MaterialApp(
title: 'Group List View Demo',
theme: ThemeData(
primarySwatch: Colors.blue,
),
home: Scaffold(
appBar: AppBar(
title: Text('Group List View Demo'),
),
body: GroupListView(
sectionsCount: _elements.keys.toList().length,
countOfItemInSection: (int section) {
return _elements.values.toList()[section].length;
},
itemBuilder: _itemBuilder,
groupHeaderBuilder: (BuildContext context, int section) {
return Padding(
padding: const EdgeInsets.symmetric(horizontal: 15, vertical: 8),
child: Text(
_elements.keys.toList()[section],
style: TextStyle(fontSize: 18, fontWeight: FontWeight.w600),
),
);
},
separatorBuilder: (context, index) => SizedBox(height: 10),
sectionSeparatorBuilder: (context, section) => SizedBox(height: 10),
),
),
);
}
Widget _itemBuilder(BuildContext context, IndexPath index) {
String user = _elements.values.toList()[index.section][index.index];
return Padding(
padding: const EdgeInsets.symmetric(horizontal: 8.0),
child: Card(
elevation: 8,
child: ListTile(
contentPadding:
const EdgeInsets.symmetric(horizontal: 18, vertical: 10.0),
leading: CircleAvatar(
child: Text(
_getInitials(user),
style: TextStyle(color: Colors.white, fontSize: 18),
),
backgroundColor: _getAvatarColor(user),
),
title: Text(
_elements.values.toList()[index.section][index.index],
style: TextStyle(fontSize: 16, fontWeight: FontWeight.w400),
),
trailing: Icon(Icons.arrow_forward_ios),
),
),
);
}
String _getInitials(String user) {
var buffer = StringBuffer();
var split = user.split(" ");
for (var s in split) buffer.write(s[0]);
return buffer.toString().substring(0, split.length);
}
Color _getAvatarColor(String user) {
return AppColors
.avatarColors;
}
}
Run
Copy the code or download it in the link below, build and run.
Reference
Here are the reference links:
| Number | Link |
|---|---|
| 1. | Download Example |
| 2. | Follow code author |
Conclusion
In this article, we have learned how to create a Sectioned ListView widget in Flutter. We have seen how to create a data model, add dependencies, and create the Sectioned ListView widget using the flutter_section_list package. We hope this article has been helpful in your Flutter development journey. Happy coding!